How to build a stud wall on a DIY basis in 8 easy steps
Need to know how to build a stud wall without calling in the pros? While this job can be a bit fiddly, our guide helps to simplify the process meaning you can feel confident tackling it yourself

Understanding how to build a stud wall can be so useful for homeowners, whether you are keen to find ways to divide up an open plan space or are planning on fitting wall hung bathroom sanitary ware.
In most homes built these days, the majority of the first floor internal walls are made up of studwork – a timber frame – with plasterboard screwed over the top. Not only is this a quick way of putting up a wall, but it’s also useful in that pipes and wires can easily be run within the hollow part of the wall.
In this easy-to-follow step-by-step guide, we take you through how to build a stud wall on a DIY basis. We've included a list of all the tools and materials you'll need, as well as information on costs.
Your shopping list to build a stud wall
"Stud walls are timber structures that are comparatively quick to put together, and a job that any competent DIYer will be able to tackle," advises DIY expert Steve Jenkins. "Having the right tools will help keep the process moving. I recommended a mitre saw for getting quick, clean straight cuts."
You might like to try the Einhell TC-MS 2112 Compound Mitre Saw from Amazon which can handle a range of materials. Before getting started, make sure you are fully equipped with the following items:
Materials:
- Plasterboard
- Appropriate studwork timber (dependent on the size of wall)
- 100mm oval nails, or screws
- Jointing tape
- Sharp knife
- Joining compound
Tools:
- Saw
- Hammer
- Nailgun (if using)
- Spirit level
- Pencil
- Workbench
- Square
- Large-bladed filler knife – the Harris 2.5in Seriously Good Filling Knife from Amazon is a great buy
- A helper!
1. Check the positioning of pipes and wires
Before doing anything else you need to be sure you are not going to be drilling into any pipework or electrical wiring.
"This can be done using an electronic detector if you are unsure," advises Turrou Landesmann, trading manager at Roofing Superstore. "It is also worthwhile to work out where the floor and ceiling joists are – if the wall is running parallel with the joists it should be installed directly above a joist."
The 8 in 1 Stud Detector Detector from Amazon is a brilliant helper when it comes to locating studs, metals, wires, and other materials.
2. Fit the floor plate
The first section of your wall to fit is the floor plate - do take the time at this stage to look into how to fit a stud wall with a door as this will affect this stage.
"Determine exactly where the stud wall is going to go. Then measure the length of the floor that the wall will cover, and cut a piece of timber batten to this length," explains Turrou Landesmann.
You should check is completely straight and cut to length before it is secured to the floors using either a nailgun or screws with rawl plugs. Try to fix the floor plate at 900mm intervals.
"Try to ensure that the nails are going into joists wherever possible, to create a secure and stable wall," advises Turrou. "If you’re planning on fitting a door within the stud wall, only put one nail in the area where the doorway will be located – this piece of bottom plate will be removed later."

Turrou Landesmann is trading manager at Roofing Superstore, a company that was launched in 2009 as an online supplier with knowledgeable customer service.
2. Fix the head plate
With the floor plate fixed, measure and cut the piece of timber for the ceiling (the head plate). You may need another pair of hands to hold it still while you check it is straight and screw or nail it into place.
If you’re able to see the timber trusses above, it will be easy to know where to screw, but if you are screwing into a plastered ceiling it will be necessary to lift a floorboard or two to locate the ceiling joists — or make a trip up into the loft in the case of first floor walls.
3. Put wall plates into place
Next up, the wall studs should be fixed to the walls the studwork is being built off, between the floor and head plates.
4. Put vertical studs into place
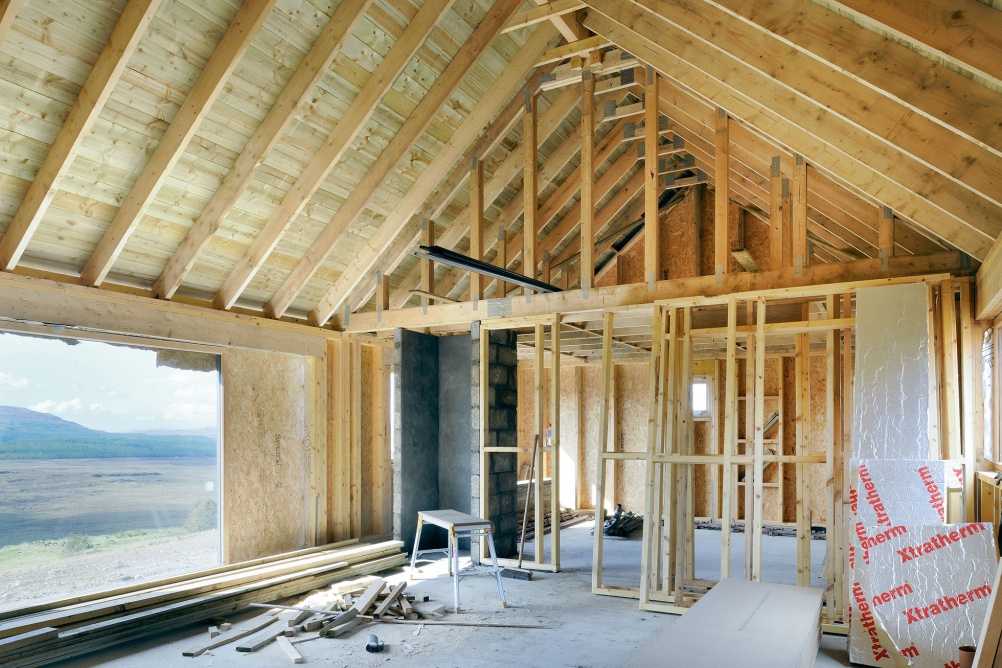
Next, measure for the intermediate studs – adding 2mm to this measurement will ensure a good tight fit. Fix the intermediate studs at 400mm centres if you plan on using 9.5mm plasterboard, or at 600mm centres if you are using 12.5mm plasterboard.
"Don’t forget that if you’re installing a door, leave a gap for the doorway," points out Turrou Landesmann.
5. Strengthen the wall with noggins
Noggins act to strengthen the structure and stop any wobbles. If you place them so that sheets of plasterboard can be screwed to them where the sheets join, you will be adding reinforcement to the plasterboard too.
"Measure the distance between each vertical stud, and cut pieces of timber accordingly, before fixing them between the vertical studs," says Turrou Landesmann. "Try to keep them relatively central, but they can be offset slightly to make nailing them easier."
6. Run in wiring and pipework
If any wiring or pipework needs to be run within the wall (usually through holes in either the intermediate studs or the noggins), do it now before the plasterboard goes on. It is also better to fix the ceiling plasterboard before turning your attention to the walls.
7. Insulate the wall
Insulating a wall will not only help with heat loss, but it will also provide a level of sound proofing to the wall.
"The easiest way to do this is to cover one of the sides of the stud wall with plasterboard, before fitting the insulation from the other side," advises Turrou Landesmann.
8. Finish plasterboarding
Now is the time for plasterboarding (which you should have already cut to fit) can be fixed in place (horizontally if possible). Fix it in place at 150mm centres.
Finally, use scrim tape over the joins, before either applying a joining compound or skim coat.
FAQs
How long does it take to build a stud wall?
"How long it takes to construct a stud wall frame will depend on the complexity of the frame and how large it is going to be," says Steve Jenkins. "If you’re looking to build a simple 4m x 3m stud wall with studs and noggins, it should take half a day to a day depending on how confident and how quick you work.
"But if you are looking to build a stud wall with windows, doors and access for electrical cables, it will take at least a day, maybe longer. Again, depending on how good your DIY skills are and what tools you have."

Steve is Homebuilding's resident DIY expert with over 20 years of experience in transforming and renovating homes. He specialises in painting and decorating, but has a wide range of skills gleaned from working in the building trade.
How much does it cost to build a stud wall?
This really is a job that it is well worth attempting yourself as you can make considerable savings.
According to Checkatrade, the cost of materials for a timber stud wall, measuring 3m x 2.4m x 125mm, is around £175 – £200.
If you bring in a professional to build the wall for you, Checkatrade estimate that you will be looking at average costs of between £800-£900, although this obviously depends on the size of the wall, the specification you are aiming for and whether they are fitting insulation, sound proofing or any wiring.
How do you soundproof a stud wall?
Stud walls lack the soundproofing qualities of a solid wall. Building Regulations insist on an element of sound resistance of a minimum 40 decibels between walls, so you will need to add acoustic insulation to the walls during the construction.
- Using a mineral wool or acoustic foam inside the studwork should do the job.
- Alternatively, you could fix two layers of plasterboard to each side of the studwork, but this will take longer.
- Another option is to buy an acoustically engineered board, such as British Gypsum’s SoundBloc or Knauf’s Silentboard.
Stud walls are a great option if broken plan living appeals to you more than a completely open plan layout. They help break a space up into zones and allow for a few more private, quieter spots.
Get the Homebuilding & Renovating Newsletter
Bring your dream home to life with expert advice, how to guides and design inspiration. Sign up for our newsletter and get two free tickets to a Homebuilding & Renovating Show near you.
Natasha was Homebuilding & Renovating’s Associate Content Editor and was a member of the Homebuilding team for over two decades. In her role on Homebuilding & Renovating she imparted her knowledge on a wide range of renovation topics, from window condensation to renovating bathrooms, to removing walls and adding an extension. She continues to write for Homebuilding on these topics, and more. An experienced journalist and renovation expert, she also writes for a number of other homes titles, including Homes & Gardens and Ideal Homes. Over the years Natasha has renovated and carried out a side extension to a Victorian terrace. She is currently living in the rural Edwardian cottage she renovated and extended on a largely DIY basis, living on site for the duration of the project.


