How to Transform a Semi-Detached Home
Claire Lloyd speaks with four architects well versed in the art of transforming semi-detached houses to discover the unique set of challenges posed, as well as the rewards
The semi-detached home is the backbone of Britain’s housing stock, and a quintessential part of the streetscape in most villages, towns and cities. Our beloved ‘semis’ come in many guises — from the characterful bay windows so common to Victorian semi-detached properties, to the strong gables and rendered and mock timber-frame façades of 1930s builds, and brick-clad estate homes of the mid to late 20th century.
Remodelling and/or extending this type of property is not without its challenges, however. Unlike the detached home, there is a significant factor which could impact, and even put the breaks on your project ambitions — the neighbouring home with which the property shares a party wall.
So what do you need to consider when overhauling a semi-detached property, and more importantly, how do you overcome the challenges presented? If the examples over the following pages are anything to go by, transforming a semi can also be a rewarding endeavour.
Addressing the Existing Floorplan
Whether you intend to extend or perhaps add a basement, or simply hope to update a semi-detached home, the starting point for any major project is a thorough look at the existing layout. As yourself these questions to help identify your needs for the space:
- Does it work for you and your family?
- Do you use every room, or are there rooms rarely used or areas which represent dead space?
- Are there walls that can be opened up to create more usable rooms?
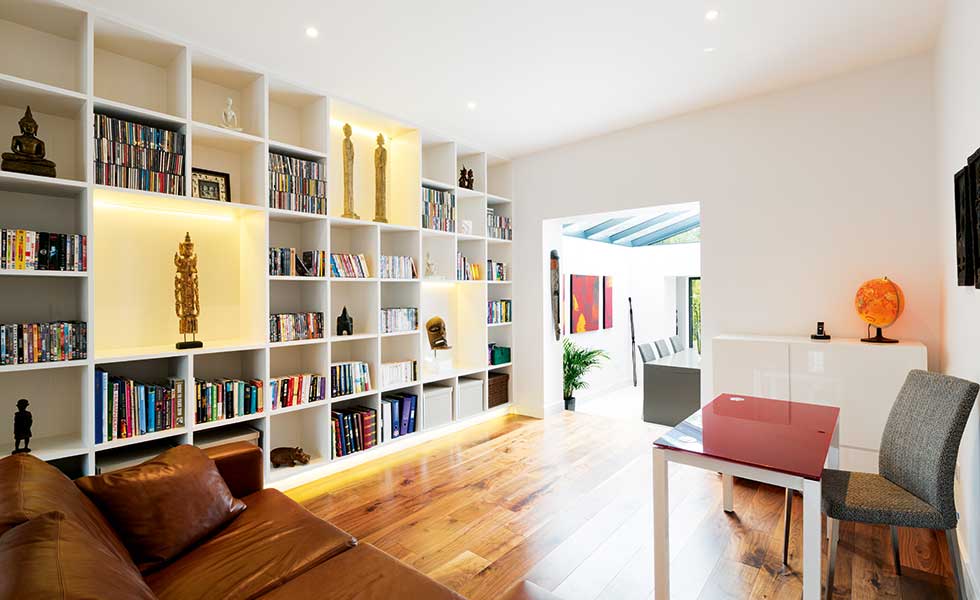
“You don’t necessarily need to add a large extension or masses of space to achieve the home you want. More efficient use of the existing space can often be better than adding more floor area,” begins architect Stuart Fullerton, whose own remodelled and extended semi-detached home is shown below.
“Give thought to how you use the existing space. Cutting circulation space down to a minimum could help. For example, the ground floor of our home is now open plan (with the kitchen as the hub) as a result of cutting circulation space. While this approach is not for everyone, we now use every inch of space.”
Moving circulation space to the side of the floorplan is another option; designed well, this could enable rooms at the front to flow into those at the rear and thus enjoy glimpses of the garden. The amenity spaces should be addressed in a similar fashion.
“Sometimes homeowners will present me with a brief to locate the downstairs WC at the rear of the house — but this tends to be the place which gets the best views and connection with the garden!” says architect David Nossiter. “It should really be positioned beneath the stairs for instance, or in the middle where there is no natural light.”
David goes on to recommend that placing amenity spaces somewhere tucked away, allows you reserve the rear for the kitchen and dining area. You can then achieve a long view from the front of the house, right through to the garden.
Embrace the Garden
Robert is Architectural Director of Granit Architects
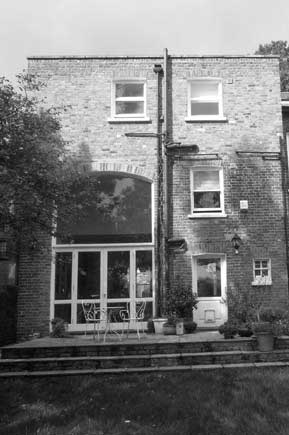
Presented with ‘before’ and ‘after’ photos of this Victorian semi in London, it’s difficult to believe that this newly extended and remodelled home is the same house. “The previous extension was an odd box, and was one and half storeys high,” begins architect Robert Wilson of Granit Architects, who was tasked with designing a scheme which would transform the tired property.
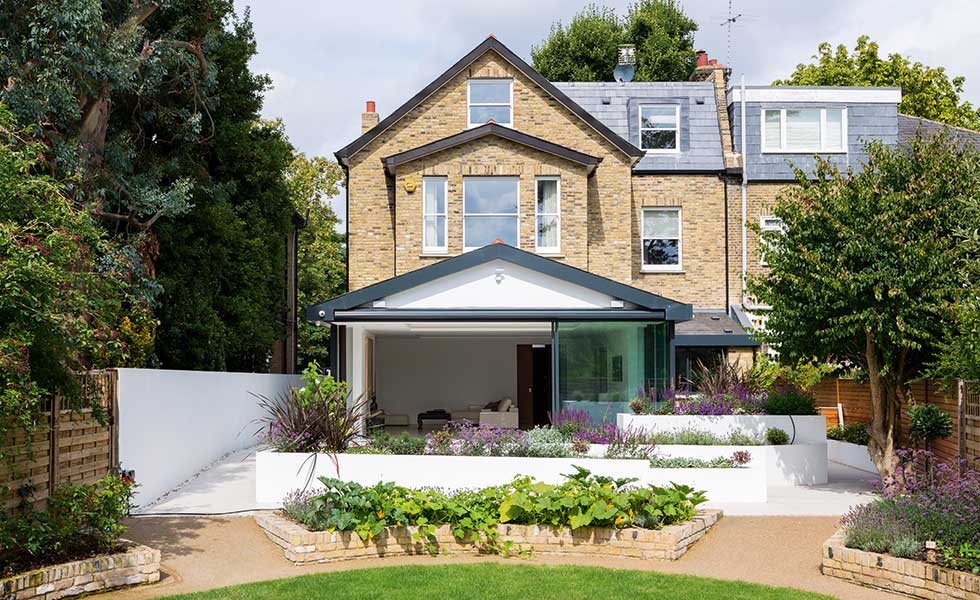
The brief was to create an extension which addressed the garden, to add a basement, and to make sense of the muddled floorplan. “Working with the existing build was quite challenging; there were steps between different rooms, and we needed to create level thresholds to accommodate the owner’s disabled son,” begins Robert. “The staircase featured a number of half-landings too. We moved the new staircase to the side of the property during the remodel, opening up the view from the front of the house to the garden.”
While the period street-facing façade has been restored, it’s the rear elevation which has seen the most dramatic makeover. A series of new extensions culminate in a single storey addition – home to an open plan kitchen, dining and living area – with shallow-pitched roof. “We provided the client with several versions of the rear. The shallow pitch has been designed so as to allow light to reach the neighbouring home,” explains Robert.
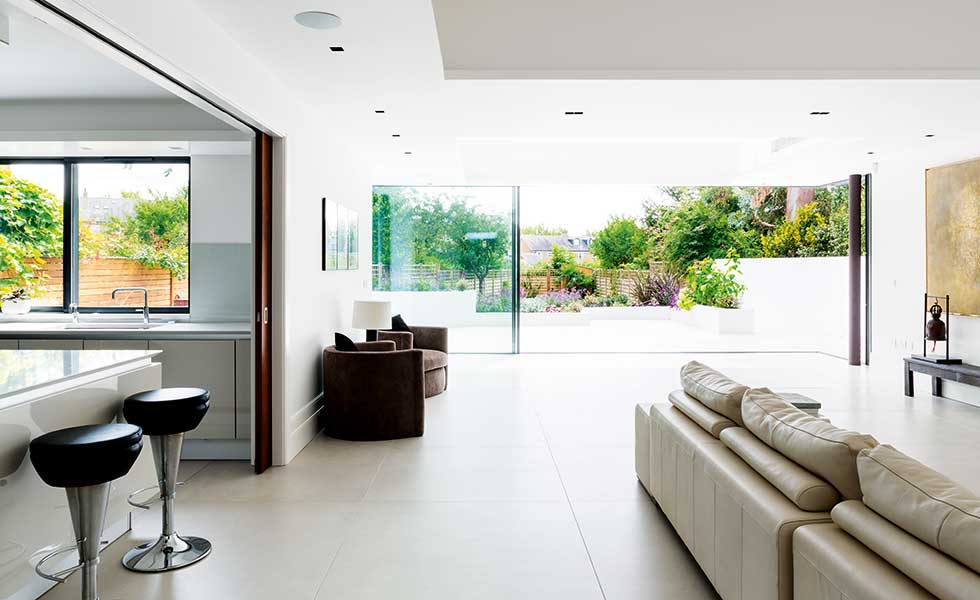
Setting the new extension 3m away from the boundary – the sizable garden helped in this instance – served two purposes: it helped to pull the extension away from the boundary (so as not to impede on the neighbour’s light), and also provided opportunity to create access and introduce natural light to the basement level.
A new landscaping scheme, including clean, crisp hardscaping, completes the picture. “The garden is important. You don’t want to specify lots of glass and then look out over an old shed left by the previous owner,” finishes Robert.
Extending a Semi-Detached Home
Extending to the side or rear of a semi-detached home can be a great means of adding floorspace, and making the most of the garden too — after all, many existing homes fail to take full advantage of the views or access to the patio and garden.
“Extending a semi is also a lot less onerous, particularly in planning terms, than extending a terrace where you have immediate neighbours either side, and there are a lot less constraints when it comes to the build,” adds James Munro, who designed the contemporary extension below.
A rear extension tends to provide more scope to introduce something a little different too; many of the projects included in this article have retained their traditional street-facing façades (often to appease planners), with a more modern extension built to the rear.
There are typically design challenges to address prior to extending though:
Overlooking can be a big issue for the semi-detached home, and adding glazing to the side elevations of a new extension may simply not be an option (particularly if one wall abuts the boundary). Maximising glazing to the rear wall, paired with rooflights, lanterns and other forms of glazing to the roof are potential solutions.
An extension will result in a deeper floorplan too, which can create central rooms, which are deprived of any source of natural light. You could consider making such rooms open plan to the new extension in order to address this issue.
In addition, a new extension or exterior facelift may have to take some cues from the neighbouring home, too. “Bear in mind that the planners might require you to match materials – for instance, the roof tiles or slates – to the house next door,” says James Munro.
Needless to say, getting an architect or designer on board with experience of this type of project can help your chances of success. If possible, appoint one with with experience of dealing with the local planning authority.
Bringing in Light is Key
Architect David is founder of David Nossiter Architects
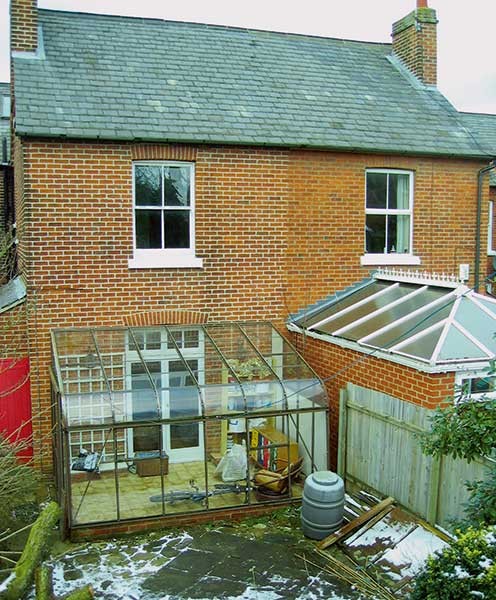
When the owners of this Victorian semi-detached home in a Colchester Conservation Area wanted to replace a glazed lean-to with a single storey extension, and transform their sloping garden, they turned to architect David Nossiter to design a contemporary scheme. The result is a white-rendered addition, housing a new kitchen diner, that leads out through to a smartly landscaped garden.
“The homeowners wanted the garden to feel like part of the house, so we significantly redesigned and terraced the sloping site, and created a level threshold between the new kitchen diner and patio,” begins David. “In order to achieve the latter we had to bring up the level of the ground floor extension by six inches.”
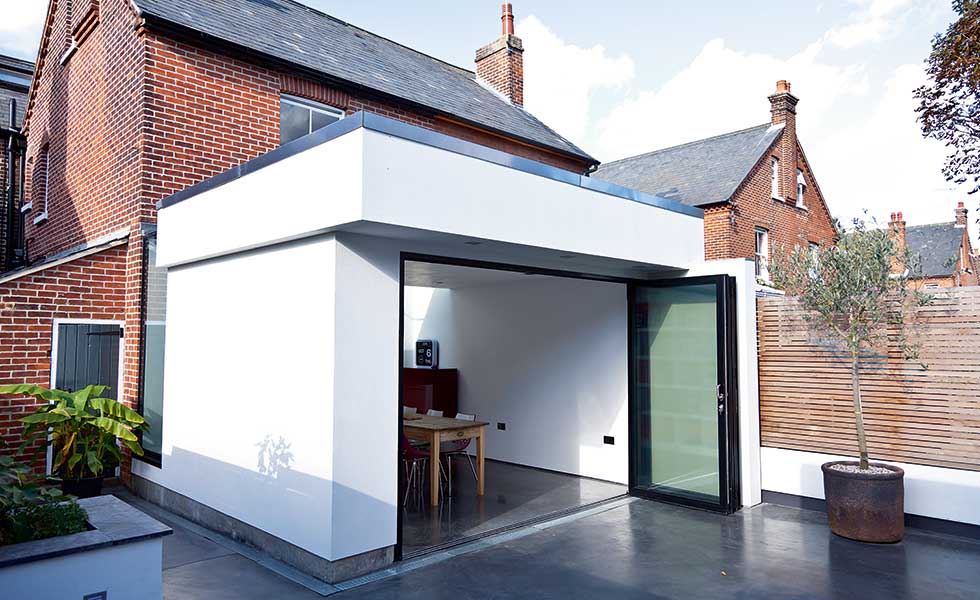
With a considerable proportion of the homeowner’s budget swallowed up by the major groundworks, David value engineered the extension so that the structure could be built in blockwork, which helped to save on costs and enabled the homeowner to project manage. Specialist contractors were then commissioned to complete the non-standard finishes, including the polished concrete flooring, sedum roof and glazing.
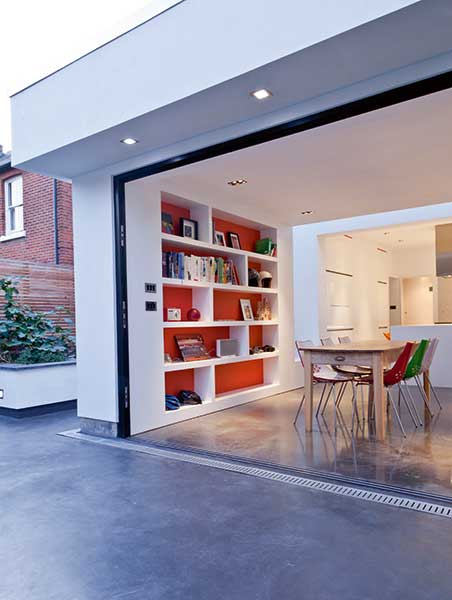
“One of the main challenges when extending is introducing light into what becomes the ‘middle’ room,” says David, who designed in a band of frameless glazing to address this issue. This clever feature also provided a solution for tying in the new extension with the existing building — providing separation between the red brick walls and new white render.
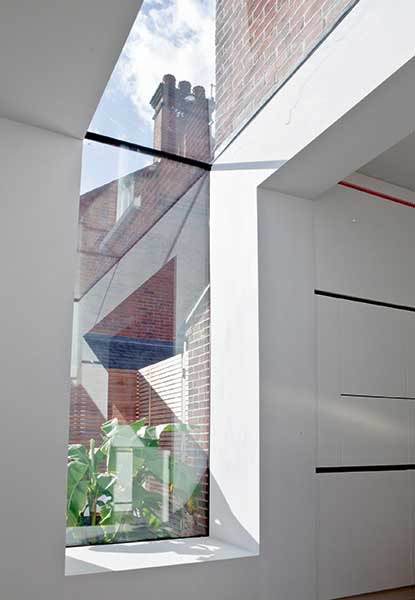
The flat roof (which is covered in sedum) not only lends to the contemporary look, but serves a practical purpose. “A pitched-roofed single storey extension is often difficult to achieve on a typical semi-detached home, due to the proximity of the first floor windows above,” explains David Nossiter. “A flat roof is one way of overcoming this whilst keeping the extension subordinate to the main house.”
The ground floor has been remodelled too, with the former rear living area becoming the kitchen, and the space provided by the new addition used for dining. The former kitchen has been turned into a utility space.
Potential Build Issues with Extensions
When it comes to the build, there could be further challenges to overcome:
For instance, access to the rear of the house might be limited. “We built our extension quite close to the boundary,” says Stuart Fullerton, “and had we not had consent from the neighbour to bring some of the materials through their garden, we would have perhaps had to have added one of the internal walls at a later stage. If access is an issue, sequencing the work is key — you don’t want to be bringing building materials through finished spaces.”
“Another potential issue is drainage, which typically runs to the side of the house,” adds David Nossiter. This can add a further level of complexity if you’re hoping to add a side extension.
It’s also worth remembering that an extension is not the go-to solution for every semi-detached home, particularly if the rear garden is small. “There’s really no use having a 3m-deep extension if this leaves just 1m of garden. Also, planners usually require a minimum of 50 percent of the garden left,” advises David Nossiter.
How to Stay Good Neighbours
- Speak with the neighbours before applying for planning permission (or, if the work falls under Permitted Development, before the plans are finalised).
- Allow neighbours to have an input (even if you do not take their ideas on board) as it will put them at ease. At the very least, let them air their concerns.
- As your architect or architectural designer to provide 3D visuals to demonstrate shadow and light and how this may affect the neighbouring property.
- Choose a builder or contractor who will be respectful of your neighbours
Top tip: “Choose a good contractor; follow up on references and trust them to deliver,” says James Munro, who describes how the contractor appointed to build the project overleaf even went so far as to leaflet the surrounding neighbours to keep them up to date with progress on site and to inform them of the next stage of the build.
This all brings us on to a fundamental part of the process — the Party Wall Act. In brief terms, the Party Wall Act was introduced to prevent building work undermining the structural integrity of shared party walls and neighbouring properties; helping to prevent disputes which might arise, and providing a route to resolution if and where they do. The following works are generally included:
- Loft conversions (which involve structural work to the party wall);
- building a new wall (for an extension, for instance) up to or on the boundary;
- most excavation work, including foundations for extensions and basements.
It’s best practice to appoint a surveyor to prepare a Party Wall Award. They will document how and when the work can be carried out, for instance, stating that work will not take place before 7am or after 7pm. But more importantly they will survey the neighbouring house (noting any existing cracks, for instance) prior to the project going on site, preparing a report on the condition of the property.
Following completion of the work the surveyor will return — thus ensuring any damage to the neighbouring house caused by the works is accounted for, and rectified. Just as importantly, it protects you from bogus claims.
Choose a Good Contractor
Architect James is Architectural Director of Granit Architects
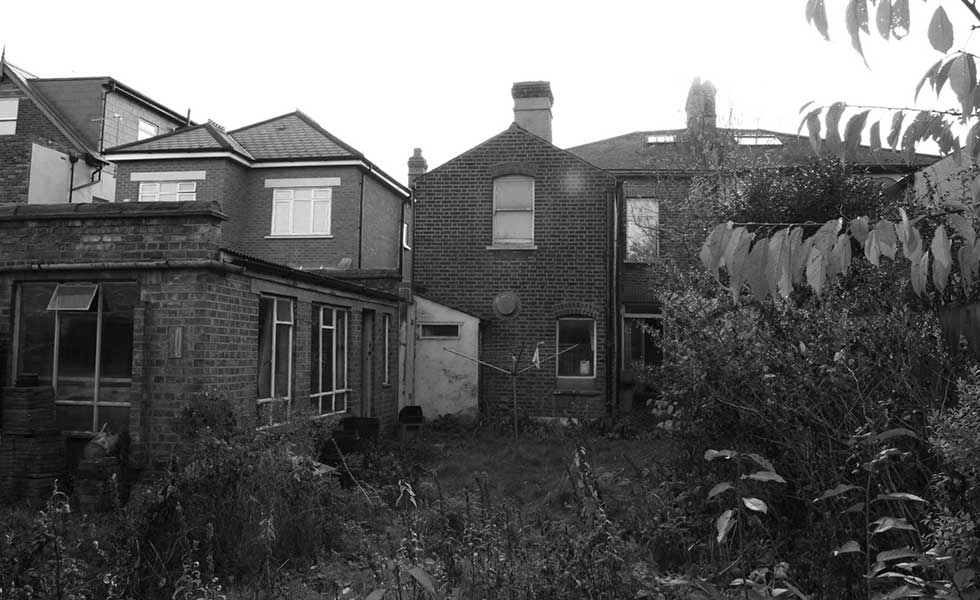
The house was in a terrible condition when I first visited: it had been vacant for two years, there was no central heating, and it probably hadn’t been touched since it was built,” says architect James Munro, describing the time he accompanied the soon-to-be owners on a viewing. What this Edwardian property in Wimbledon did have, however, was potential.
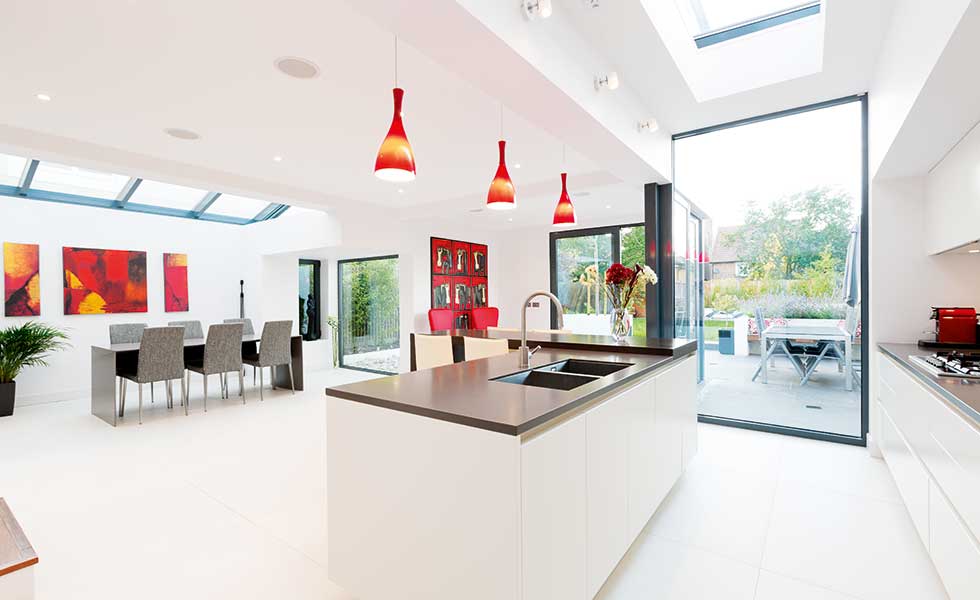
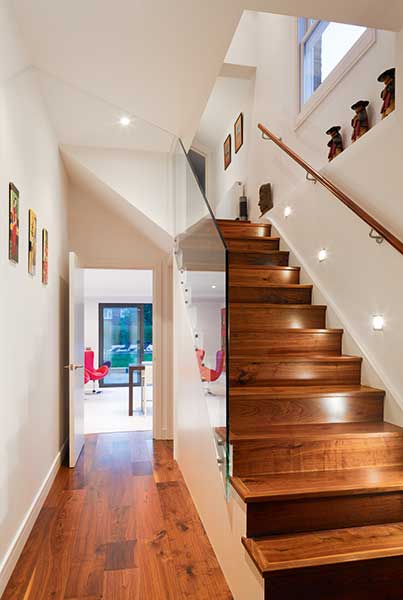
“The new owners, Simon and Aurelia, were very engaged in the process and their brief was for a contemporary home,” begins James Munro. The resulting scheme has seen the existing floorplan completely overhauled, with two side extensions added to provide space for a generous open plan kitchen and dining area and separate utility and WC on the ground floor, and a loft conversion offering more bedroom accommodation. “There were few internal walls left during the project,” says James.
“The adjoining property had already been extended, so set the precedent for how far we could extend at the rear,” continues James. The existing poorly built extensions and outbuildings were removed to make way for the new single storey extensions, with the rear elevation further opened up to introduce glazing. A render finish ties together the new work, and provides a modern look. From the restored front elevation, however, there is little evidence of the dramatic changes.

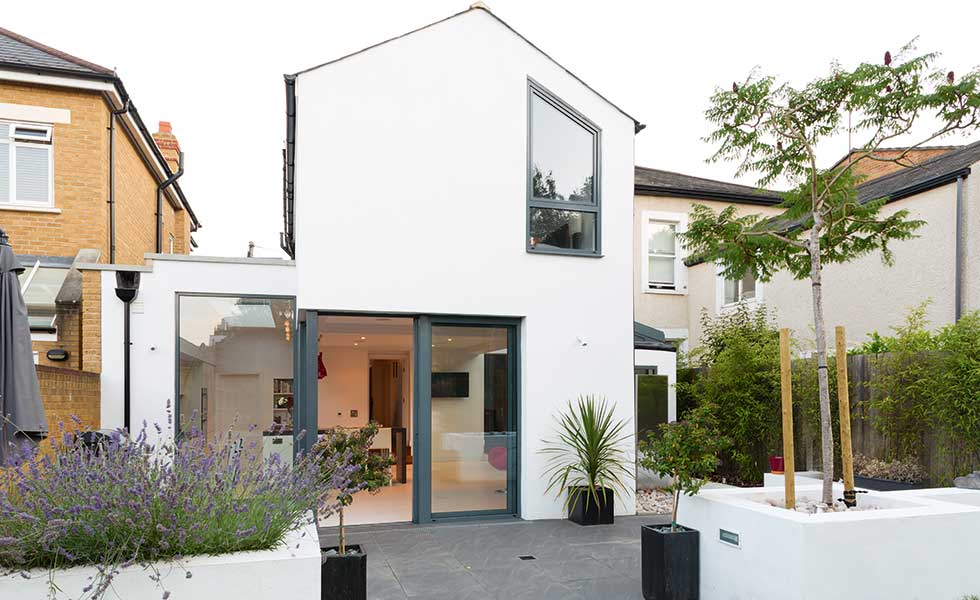
James undertook a thorough cost engineering process prior to the build going on site, in order to ensure the work fell within the clients’ budget. “With the property having been empty for two years, the clients paid VAT at 5 per cent too,” he adds.
Despite careful planning, there was the occasional unforeseen event on site. “We had dug trial holes, but a new build on the adjacent plot had some of the widest and deepest foundations that the structural engineer had ever seen (they were almost 3m wide by 2.5m deep), which caused some technical difficulties when it came to digging the foundations for the one side extension,” explains James.
“Picking a good contractor is important,” he continues. “The contractor on this project, BTL Property, are very client facing and respectful of the neighbours; they would even put leaflets through the surrounding doors to inform the neighbours of the next stages.”
Adding a New Basement to a Semi-Detached Home
Converting an existing cellar or adding a new basement can be another excellent means of introducing floorspace, particularly in urban areas where space is at a premium and where the garden is limited — this type of project tends to be financially viable in high-value areas such as the south-east and London. There is also an increasing trend for adding a new extension together with excavating for a new basement beneath.
However, addressing your neighbour’s concerns is again key. “People tend to be nervous about basements because of the media headlines and disaster stories,” says Robert Wilson. “You need to explain to your neighbour that you have employed an architect and a contractor with experience of this type of project, the plans have been passed by Building Control, there is a Party Wall Award, etc. There are safeguards in place — both for you and your neighbour.
“There are also plus points to building a basement for your neighbour, which you could also raise during the dialogue,” continues Robert Wilson. “For instance, if you’re building up to the party wall, then if your neighbour ever wanted to add a basement themselves, then you’ve created a ready-made wall to one side, saving them money. It could be good leverage.
“We do have projects which have turned into a joint venture, too,” adds Robert Wilson. “For instance, we’ve had homeowners discuss a loft conversion with their neighbour, with the neighbour then deciding to convert their loft at the same time.”
What Will it Cost?
So what should you be budgeting for work to a semi-detached home? Robert Wilson provides a rough estimate:
- A basic refurb (including basic wiring and decoration) will cost in the region of £500-£1,000m2
- Adding an extension will cost around £1,500-£2,500m2
- Basements tend to cost in the region of £2,500-£3,500m2
“There are however classic elements of a project which can blow the budget, like a high-end kitchen, and increasingly AV (audio video) systems. Do not forget to factor in VAT too to your costings,” warns architect Robert Wilson.
“If you don’t have the funds for the entire project, you could consider a phased approach,” adds James Munro. For instance, the first phase may be a major remodel of the existing house, with a loft conversion following on at a later date. The key here is taking a holistic view and plan for future work; if you’re rewiring and replumbing the entire house, then ensure the plumbing and electrics are in place in the loft space for ease of conversion.
Marry Old With New
Architect Stuart is Director of Wildblood Macdonald
An extension and remodelling scheme has transformed architect Stuart Fullerton and wife Sally’s 1930s York semi into a home which meets the needs of their family
"We’d lived here for 12 years before we undertook this project,” begins homeowner Stuart Fullerton. “We had no intention of undertaking work to this house, however the floorplan was not conducive for a family with three children, particularly teenagers.”
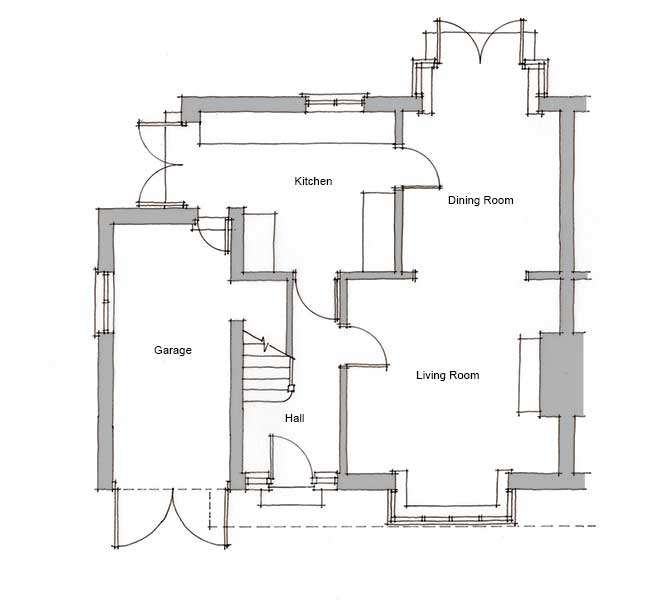
This was a real case of move or improve. As an architect, Stuart was well-placed to design a scheme which would transform the way in which the family used their existing home. The result is two new additions and a remodelled floorplan.
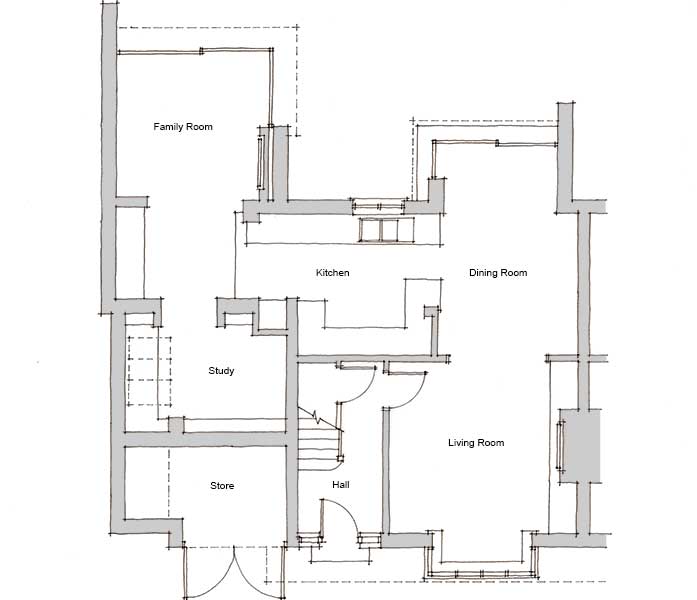
“The dining room previously had single-glazed patio doors; it was cold and draughty, and hardly ever used. Now it’s one of the most used spaces in the house,” says Stuart. The new sliding glazed screens are from Fineline Aluminium.
To the other side of the floorplan, the integral garage has been incorporated and a second, larger extension added, providing space to accommodate a new family TV room and a study and store. The existing ground floor rooms have been opened up too so that the spaces are now connected.
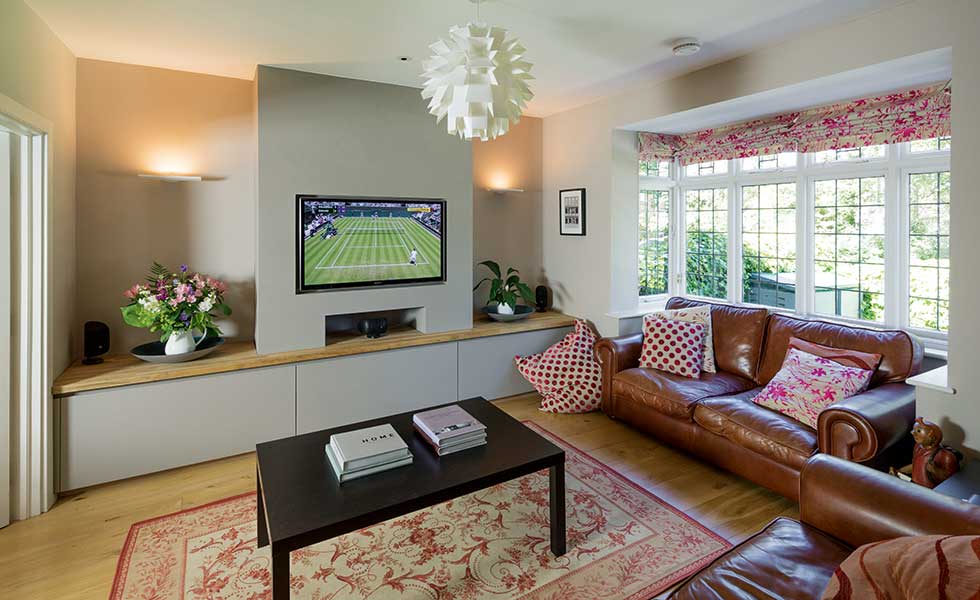
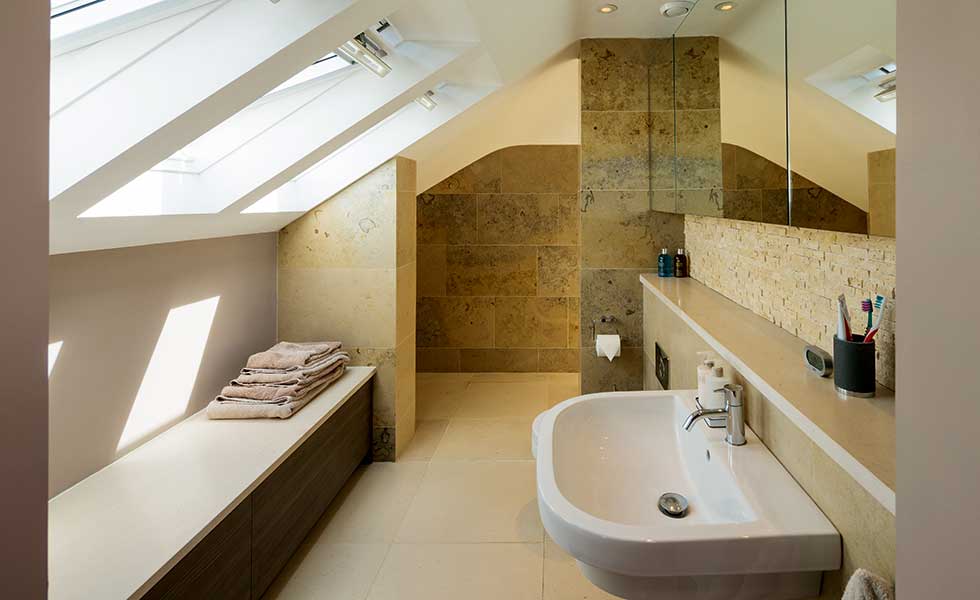
The first floor has also been subject to change. “A key requirement was to free up the first floor study in order to create a further bedroom. Plus, we’ve tucked a second bathroom beneath the roof space of the extension — it’s a necessity with three children.”
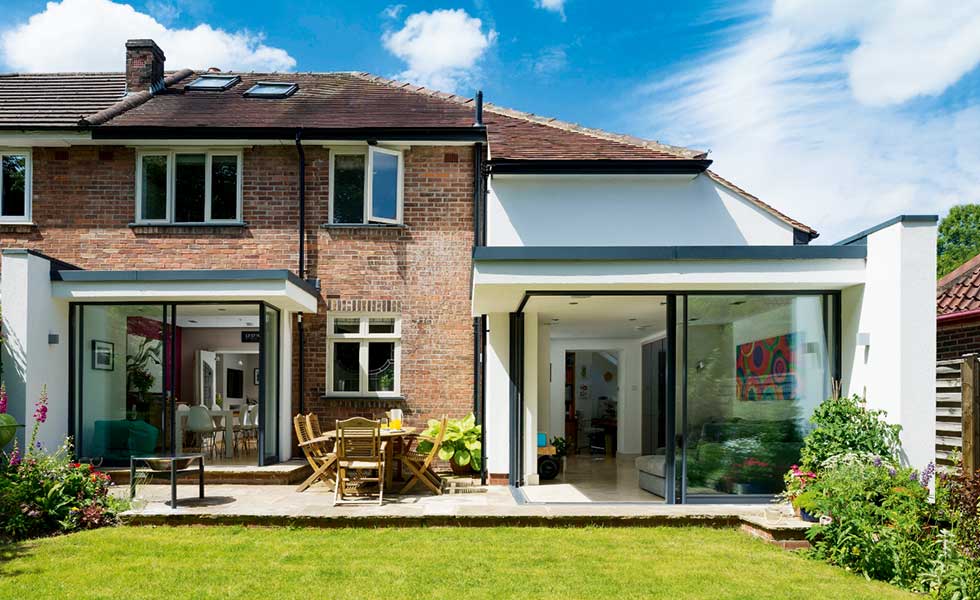
The new additions have been clad in Sto’s self-coloured render, chosen to echo the render which features on the front of this 1930s semi. The project is a real marriage of old and new. “From the front, there’s very little hint, but as you enter you begin to notice the changes,” says Stuart. Details such as the restored stained glass window which sits alongside the sleek, modern kitchen provide a comfortable and pleasing juxtaposition.
The family remained in the house during the project, which went on site in summer 2013, finishing in early 2014. “We planned the project so that the majority of the structural work took place during the summer holidays — my wife took the children away, while I remained in the house to project manage. The experience wasn’t always easy, and the microwave was often moved from room to room,” smiles Stuart.
“We employed a local builder (we often deal with larger contractors at the practice, but this project was too small for them to consider). The builders were considerate, keeping the site clean and working around our family — for instance, they wouldn’t turn up just as we were preparing for the school run.”
While the resale value was not a priority for the Fullertons, the carefully considered scheme has added value. The house went on to win the York Design Award in 2015.
Get the Homebuilding & Renovating Newsletter
Bring your dream home to life with expert advice, how to guides and design inspiration. Sign up for our newsletter and get two free tickets to a Homebuilding & Renovating Show near you.
Claire is Brand Development Editor and the former Editor in Chief of Homebuilding & Renovating website and magazine. She became Editor of Homebuilding & Renovating in 2016 and has been a member of the team for 16 years. An experienced homes journalist, her work has also appeared in titles such as Real Homes and Period Living.
She has a particular interest in green homes and sustainability, and interior design is a passion too; she has undertaken qualifications in this area.
After finishing a major renovation of a period cottage, she is now onto her next project: overhauling a 1930s property in the Shropshire countryside.

