Grasping the basics of how to tile a kitchen wall is the ideal way to cut down on labour costs and add a new skill to your DIY arsenal. As always practice makes perfect but you will need to know the basics which you’ll find in this guide.
When designing a kitchen choosing the perfect tile is all part of the process. And you don’t want to spoil the aesthetic with poorly placed and poorly applied tiles. Plan ahead where you are going to start and tackle an easier project, like above a countertop, if you're new to the art of tiling.
Tools you'll need to tile a kitchen wall
Follow these lists of the best tiling tools and materials you'll need to tile a kitchen wall effectively.
Made from high-quality carbon steel giving longevity and durability. The handle provides a strong connection to ensure even spreading of adhesive.
M-D Gum Rubber Float
This float features a flexible rubber pad with a comfortable ABS handle to provide comfort when using. Ideal for ceramic wall tiles.
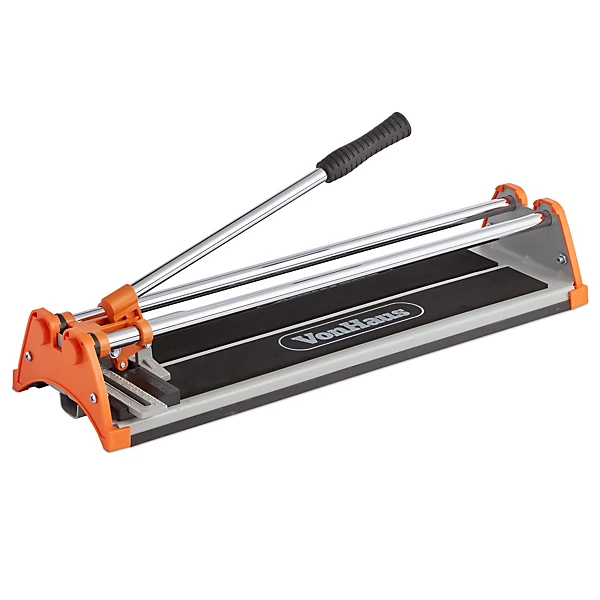
Vonhaus Manual Tile Cutter
A compact and intuitive design makes this manual tile cutter easy to use. Its tungsten carbide blade cuts through tiles up to 430mm long and 12mm thick.
How to tile a kitchen wall
1. Prepare your space
TOP TIP #1
Pick up the tiles shortly before you are due to undertake the work to benefit from the return window if you have any surplus boxes at the end.
Use an online tile calculator to work out how many tiles you need, and remember that it’s better to over order by about 10% extra to account for wastage and return what you don’t need. This ensures that all the tiles are from the same manufacturing batch (so more likely to be the same colour).
Make sure before beginning that you cover your worktops, units and appliances with a protective cover.
Prepare the walls surface by removing any dust, wallpaper and repair any holes or uneven surfaces. You’ll want to work from a flat surface; you may have to patch plaster if there are any large holes.
If the wall is not completely flat then it can be more forgiving to use smaller tiles.
(Image credit: Emma Downer)
2. Where to start
A good place to start is at the centre of the cooker or another distinguishing feature that your eye is drawn to as you enter the room. Alternatively, start in the centre of the room; you may like to start slightly off-centre so that you don’t end up having to make difficult cuts in the corners.
3. Add the tiles
If your worktops are level than you can tile directly from the worktop. But if they aren't level then start one tile above the worktop and cut in the first row at the end, to give it the appearance of it being level.
Work out how much tile adhesive you need and mix it up. Use the trowel to apply enough to the wall, for around 1ft of tiles at any time – this way you can work before it dries.
Place a spacer in-between each tile, and when placing the tiles give them a slight wiggle so that the tile adhesive spreads underneath the tile.
(Image credit: Emma Downer)
Ryan Meagher
Ryan works as Business Development Manager for his family's residential construction company. He has a diverse background with everything related to residential construction and has successfully completed many large-scale renovation projects.
4. Work around sockets
If you have sockets to navigate, turn off the electrical supply and unscrew the face plate from the back box. Mark on the tiles where you need to make cuts with a marker pen. If you are using a manual cutter then score along the L-shaped line.
Use a tile saw to cut the shorter line and snap the longer line with the tile cutter. Try to avoid overtightening the faceplate as this may crack the tile.
Ryan Meagher of BVM Contracting says, "You will want to cut the tile back just enough to uncover the holes of the electrical socket box so you can screw in the electrical socket receptacle or switch and it can sit snug with the outside surface of the tile."
He adds, "It's a be a good idea to use longer screws (like these Extra Long Socket/Plug Screws from Amazon) to screw in the receptacle or switch into the electrical socket box. Or cheat the box out a little bit so it is easier to screw in the receptacle or switch into the box once the tile is installed."
However, if your using larger tiles you will want to take a different approach as Meagher explains, "Start your tile so the edge of the tile starts on one side of the electrical socket. This will make it easier to work around the electrical socket and make the cut way easier than having to cut out an area in the middle of the tile."
He adds, "If you have multiple electrical sockets try to figure out a configuration that will lead to the easiest cuts into the tile." But to make things simpler he suggests, "Go with smaller tiles or mosaic tiles to make your life a little easier."
(Image credit: Emma Downer)
5. Grout the tiles
Leave 24 hours for the adhesive to dry before grouting - if doing it yourself, make sure you know how to grout tiles, otherwise call in a professional.
The grout should be pushed into the gaps with the grout float using a pumping action to make sure the gap is full, wash off any excess with a sponge.
Meagher says, "Ensure that the grout is viscous enough so you can avoid having a lot of the grout fall off the tile when you are spreading it." As an extra precaution he says, "You should also cover the surface beneath because there will inevitably be some grout that falls off the tile."
Another tip is lying a wet towel over adhesive or grout can help soften it if it does dry unexpectedly.
6. Finish the edges and apply silicone
Finish the edges with metal or plastic edging, and make sure to pick up the right depth for your tile. Between the tiles and the worktop apply a bead of silicone and run a wet finger across to finish.
It is possible with just some simple prep of the surface of the tile with a primer like this Tilemaster Prime + Grip Multi-Purpose Bond Enhancing Primer from Amazon. Or, by sanding down the tile face. Keep in mind the weight of the surface that you are tiling as the wall will need to be strong enough to hold the weight of the new tiles.
Do I need to prep the wall?
If you are tiling on fresh plaster or plasterboard it’s a good idea to prepare the surface with a primer like this Mapei Clear Plaster primer from B&Q. This stops the surface from socking up too much water from the adhesive which could affect the bond.
Bring your dream home to life with expert advice, how to guides and design inspiration. Sign up for our newsletter and get two free tickets to a Homebuilding & Renovating Show near you.
Emma is a UK-based DIY educator and director of the social media brand DIY With Emma, whose primary mission is to help more people get into DIY through sharing DIY hacks and how-tos. The DIY influencer, whose videos have received millions of views, has recently renovated her 19th-century cottage on a tight budget, has also created DIY content for Homebuilding & Renovating.