So, you’ve chosen your ideal worktop material and you’re ready to refresh your kitchen with new worktops. Now’s the time to join your worktop sections and fix them securely in-place.
Joining kitchen worktops is beyond the average DIYer’s capabilities (and toolkit) – but it’s possible to do at least some of the work yourself. We spoke to expert carpenter and kitchen fitter, Lewis Wiseman of LTW Carpentry Solutions, to find out how you should approach each step of joining and fitting, from choosing the right type of joint to connecting and securing your worktop sections.
Bear in mind that some worktop materials are harder to work with than others. For example, quartz and granite worktops are very heavy, and they can’t be cut at home as the dust they produce can pose a risk to your health.
What you'll need to join kitchen worktops
Joining and securing worktop sections requires numerous tools and accessories, some of which are expensive. You’re likely to need the following:
Half-inch router with at least a 1,800W motor
Half-inch router bit and a 30mm guide bush
Worktop jig
Circular saw or track saw
Silicone gun
Worktop adhesive and joint sealant
Rubber mallet
Jointing biscuits or connector bolts
Biscuit jointer
Tape measure or laser measuring tool
Clamps
Straight edge tool
Pencil
Jigsaw
Joiner’s benches (two or more)
Clamps
Spirit level
Certain kitchen worktops require additional tools or materials, such as a cordless combi drill for screwing a kitchen unit to a laminate or wood worktop. If in doubt, ask your worktop supplier for advice on what you’ll need.
These tools can help with joining kitchen worktops
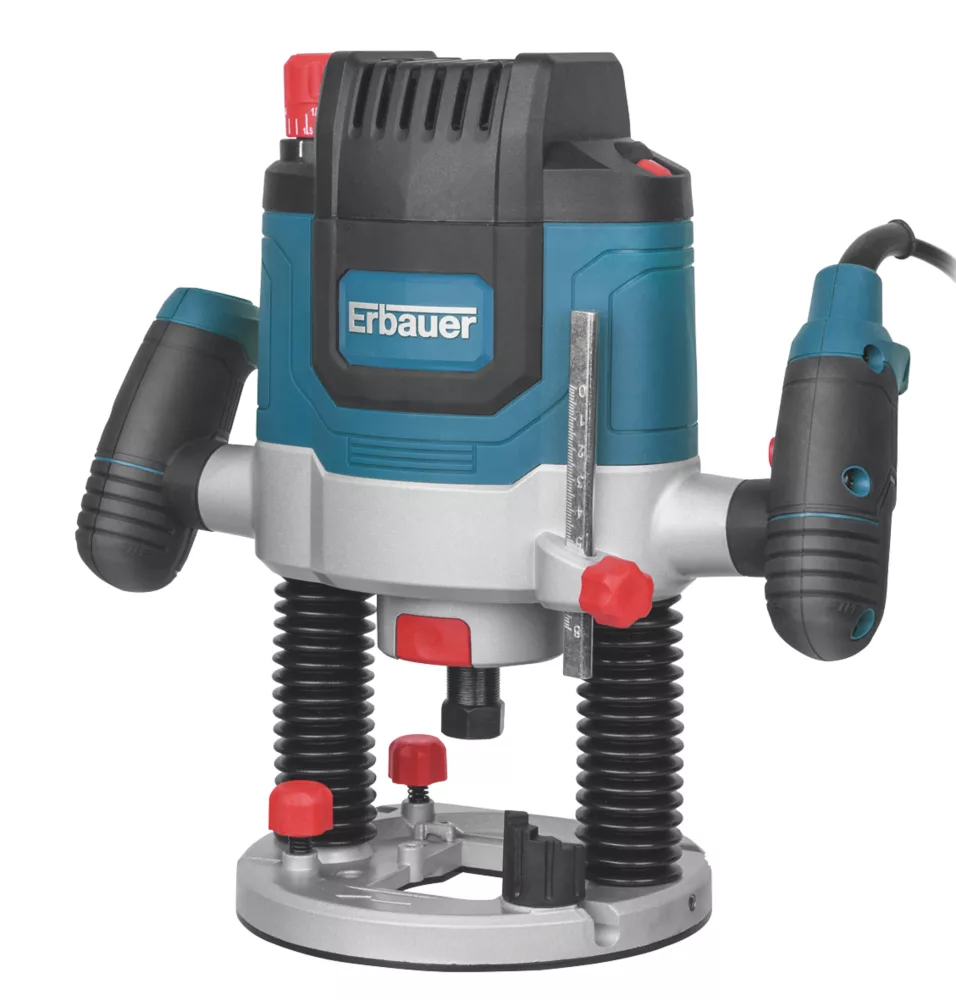
Erbauer Er2100 1/2" Electric Router 220-240v
A router is essential for cutting worktop pieces so that they can be joined together at a joint. You'll need a pretty powerful model to get the job done. Don't cut quartz or granite worktops at home.
Trend No. 20 Jointing Biscuits (100 Pack)
Jointing biscuits are an essential component for securely connecting wooden worktop sections. Used with an adhesive, they take in moisture and swell slightly to create a tight joint between two pieces of worktop.
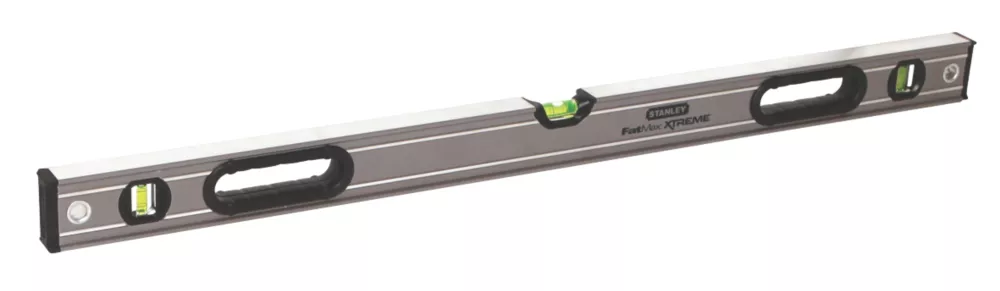
Stanley Fatmax Box Beam Level 72"
Keep checking the level of your worktop sections throughout joining and installation. If the worktop seems uneven, you can correct the level by adjusting the feet of your kitchen units (if present) or inserting packing under low points of the worktop.
Lewis Wiseman
Lewis Wiseman is the owner of LTW Carpentry Solutions, which provides carpentry, joinery and kitchen fitting services in the Essex area. Wiseman shares his knowledge with thousands of subscribers on YouTube.
How to join kitchen worktops
1. Plan the perfect joint
The joint is where one section of worktop meets another. Various profiles of joints are used for this purpose, with the best choice often depending on the worktop material.
Some commonly used joints include:
Butt joint – one worktop section butts up to another.
Mitre joint – two sections meet diagonally.
Mason’s mitre joint – similar to a butt joint, but with a curved section at the ‘near’ end of the joint.
“Typically with solid wood worktops you would simply use a butt joint,” says Wiseman.
For laminate worktops, Wiseman recommends creating a mason’s mitre joint, with worktop connector bolts joining the sections together.
“The connector bolts come in two types, the first being the older type which you tighten with a 10mm spanner, and the second and more modern type being a zip bolt that you tighten using a 4mm hex bit,” he says.
“You can then use silicone as the adhesive for the joint.”
If you’re installing quartz or granite worktops, Wiseman suggests using a butt joint, secured with a colour match epoxy glue to make the joint strong.
At this stage, take a moment to ensure your kitchen units (where the worktop will be installed) are as level as possible. Many have adjustable feet that you can use for this purpose.
2. Cut the worktop sections
*Please note: some worktop materials such as granite and especially quartz should not be cut at home, as they release hazardous dust that requires highly specialised treatment. Even if your worktop is made from a material that’s suitable for cutting at home, such as wood or laminate, you should still wear a very good dust mask or respirator (£31.49, Screwfix) during cutting.*
Now that you’ve decided how you’ll join your worktop sections, you can cut them so that they’ll join together and provide the desired work area. You might also need to make cut-outs in certain places to accommodate a sink, or an integrated appliance such as a hob.
Getting your measurements right will be crucial, so measure each dimension twice (at least!) before you cut once. Factor in any cut-outs and decide how far you the worktop should overhang at the front.
“To get a good join between worktops you need to ensure you have a nice, cleanly cut edge, which you can normally create by using your router in conjunction with a worktop jig,” says Wiseman.
“Once you have cut your join and you’re happy with it you need to make sure there is nothing that will stop your two joining pieces coming together, such as dust or loose chips of material.”
You may also need to prepare the joint-forming cut edges of the worktop sections so that you can install the components to secure them together. For example, in wooden worktop sections you would typically use a biscuit jointer tool to make matching slots where jointing biscuits can be inserted.
If there is excess material on a side of a worktop section that will not form a joint, you can cut this off using a circular saw or track saw. Cut-outs (e.g. for a sink or integrated hob) can be made using a jigsaw, ideally assisted by a straight edge guide (£10.55, B&Q).
Before you continue, it’s possible that your kitchen worktop will need some time to acclimatise to your home, depending on the material. Check with the retailer for guidance.
3. Join the worktop sections
The worktop sections can now be lifted into place and joined together. Some worktops are very heavy, so you might need help to lift your sections into place
Exactly how you join the sections together will depend on your chosen joint and the material (see ‘Step #1: Plan the perfect joint’’). For example, you would likely use connector bolts for granite or jointing biscuits for wood.
Wiseman advises using a generous amount of adhesive, as well as connective components, to ensure a strong join between the sections.
“The key is to use so much adhesive that it squeezes out of the joint, ensuring complete coverage, and then thoroughly clean off the excess before it sets,” he says.
“When bringing the joint together you want to make sure the top surfaces of the joining sections are flush with each other. When they’re flush, do up your worktop bolts tightly to make sure that there is no movement causing the joint to fail.”
Some professional joiners use a special vacuum suction tool to perfectly align worktop sections. Really good ones – like this IMT set (£323.13, Amazon) – are expensive.
Check whether your joined worktop is level, using a spirit level. If it isn’t, you can level it up by sliding packings, such as these plastic shims (£9.99 for 60, Screwfix), under the low points.
4. Secure the worktop to the kitchen units
With your worktop sections joined together on top of the kitchen units, you can secure the worktop in place. Doing this quickly should help ensure the worktop sections bond securely and evenly (but you should keep checking their level as you work, making adjustments if necessary).
“For a wood or laminate worktop, it is standard practice to screw the worktops to the units from underneath, ensuring the screws don’t come through the top of the worktops,” says Wiseman.
To make this easier to do, you’ll need to drill pilot holes through the top of the kitchen units and part-way into the underside of the worktop.
“If your worktop is made of granite or quartz, you’d typically silicone the worktop sections to the units,” Wiseman adds.
Gavin Shaw
Gavin Shaw is MD of Laminam UK, a producer of high-quality ceramic slabs for kitchen worktops and other applications. Shaw has over 20 years’ experience as a company director in the stone surface industry, with expertise across porcelain, quartz and natural stone.
FAQs
How should I finish my kitchen worktops?
After you’ve successfully joined and secured your kitchen worktop idea, you can move on to some finishing touches. You might consider adding jointing strips to cover seams, or edging strips to conceal ‘raw’ edges. It’s common practice to apply a line of sealant (using a silicone gun) to seal the worktop against surrounding walls or cabinets.
Most kitchen worktop materials will also benefit from having a sealing solution applied to protect the worktop against damage or staining. The best product to use will depend on your chosen material. For instance, Liberon Laminate Clean and Seal (£17.67, B&Q) is a popular choice to protect laminate worktops.
Can you join kitchen worktops DIY?
Plenty of confident DIYers succeed in joining their own kitchen worktops, but it’s worth weighing the advantages of this approach against the benefits of hiring a professional joiner.
“Opting for a DIY installation can reduce labour costs, but it requires careful planning and precise execution,” says Gavin Shaw, managing director of Laminam UK, a porcelain worktop manufacturer.
“You might look at other ways of saving money, such as simplifying your design or reducing the amount of slabs needed.”
Wiseman also argues a strong case for getting your worktops installed by a professional.
“Because they’re experienced, they can be much faster at carrying out the task, and in most cases they’ll achieve a high standard of finish,” he says.
“Another advantage is that a pro will already have the tools needed to carry out the task. Some of these can be very expensive, so in most cases it will actually work out cheaper to hire a tradesman rather than buying the tools yourself.”
With all that said, joining kitchen worktops can be a challenging, satisfying project for homeowners who enjoy DIY and don’t mind investing in some new tools. A good compromise could be to hire a professional to cut and deliver your worktop, and then fit it yourself.
Bring your dream home to life with expert advice, how to guides and design inspiration. Sign up for our newsletter and get two free tickets to a Homebuilding & Renovating Show near you.
Pete Wise is a freelance writer and keen DIYer from Leeds. Pete's tool reviews have featured in titles including Homebuilding & Renovating, Ideal Home and The Independent. He also writes features and news articles for publications such as The Guardian, BBC Good Food and T3. When he isn't busy writing, Pete can often be found at libraries, pubs and live music venues. He finds tile-cutting strangely zen.